概述
Netty中Channel接口的描述:
A nexus to a network socket or a component which is capable of I/O operations such as read, write, connect, and bind.
即是一个对socket连接的抽象,在都满足这一抽象的前提下,Netty对Channel的实现也有很多种类,本篇将主要记录对NioServerSocketChannel和NioSocketChannel这两种Channel实现的学习。
Channel的继承关系
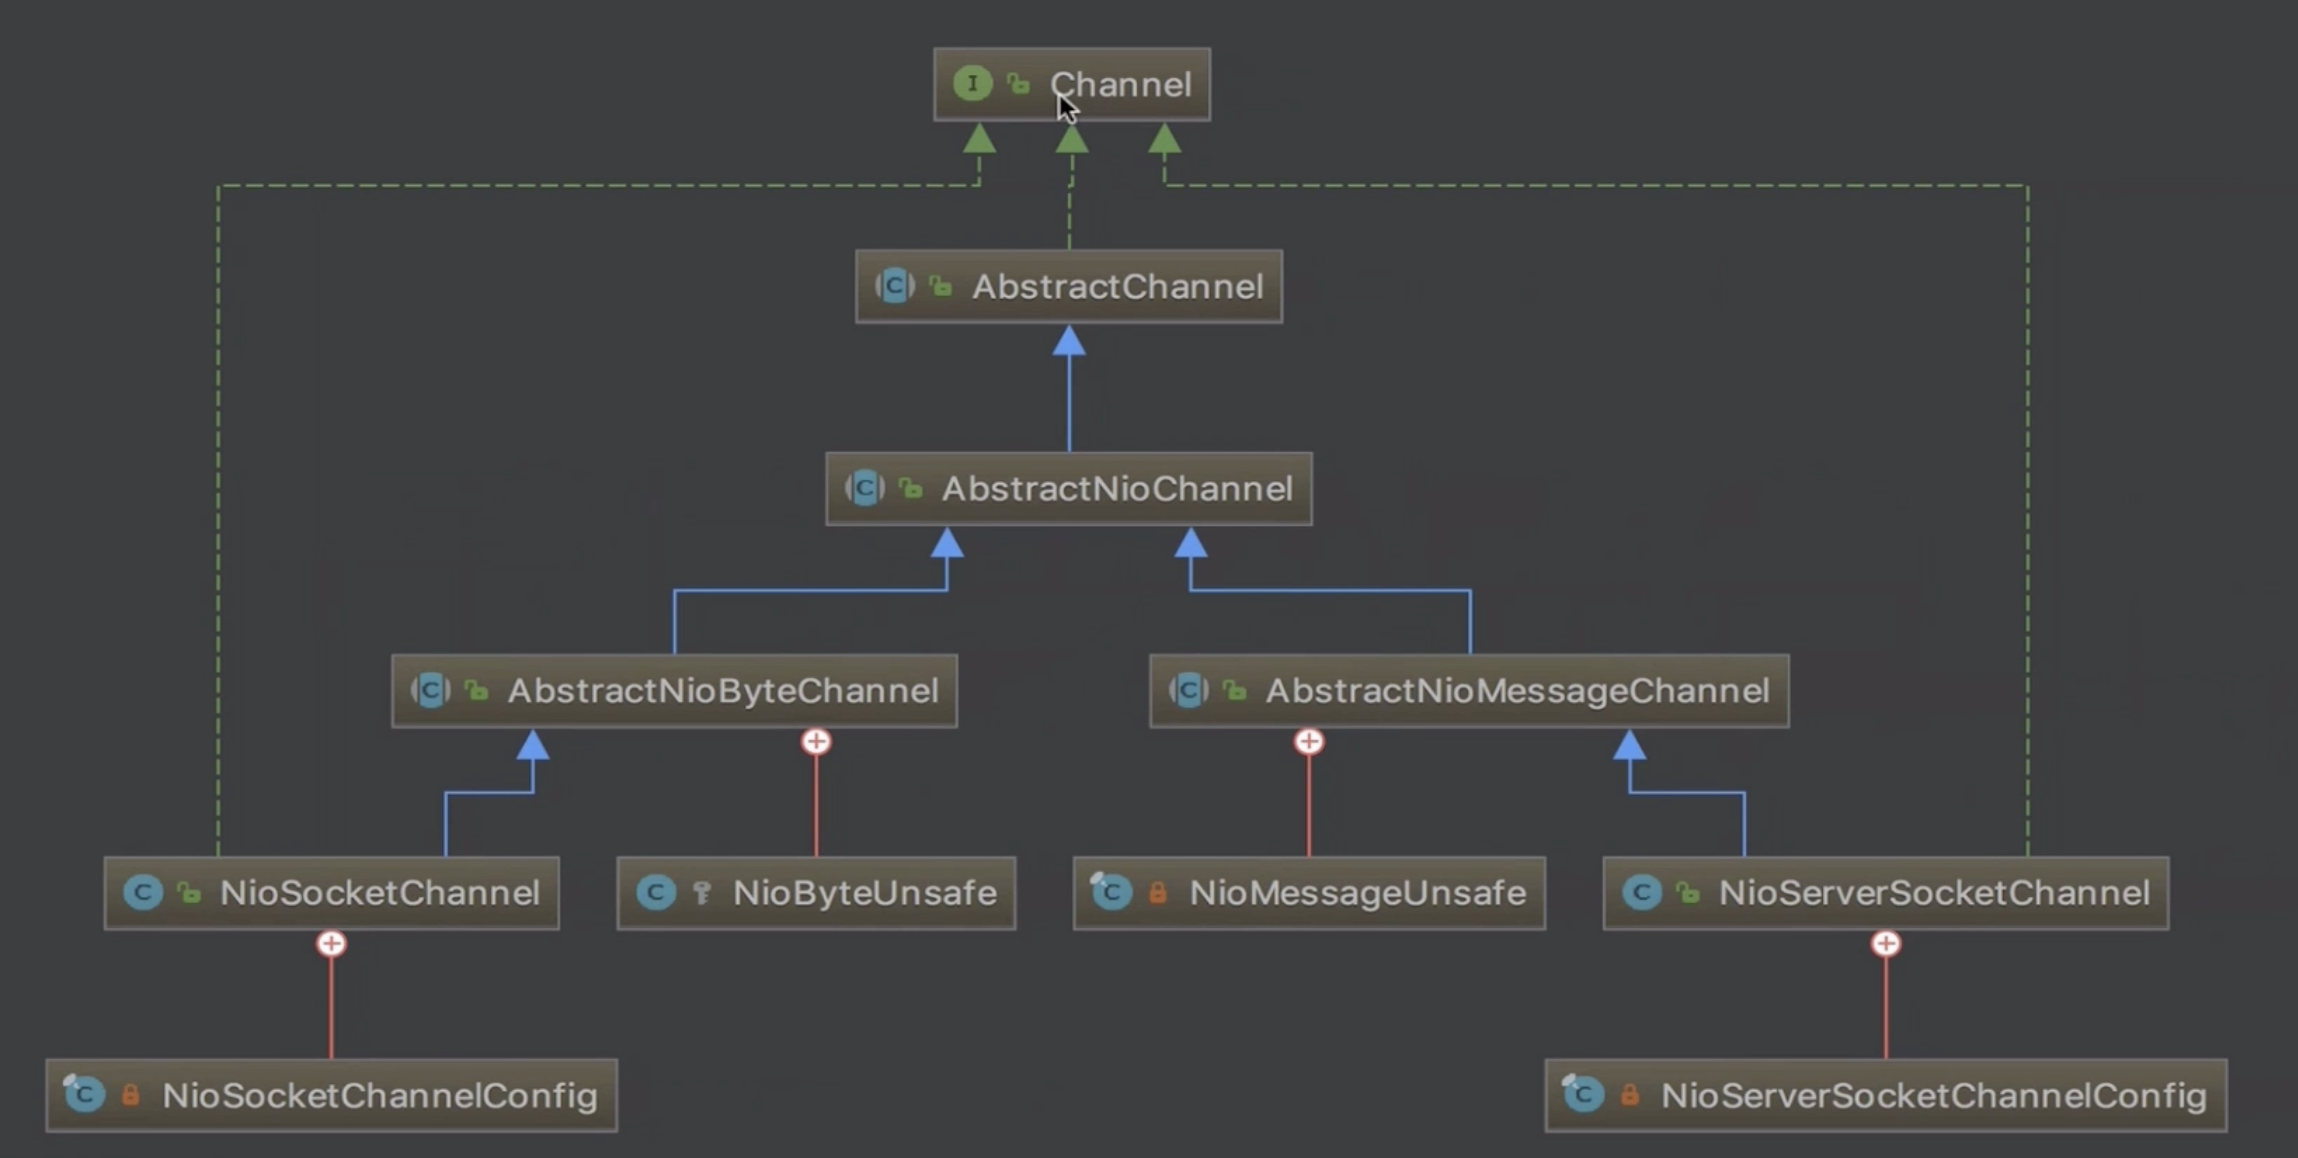
基于上面的这个这个继承关系图,来一层一层分析每一层的抽象主要都是做了什么事情.
1. Channel
提供了接口规范,是对连接的抽象。 Channel接口中还定义了Unsafe接口,简单来说的话,是要使用Unsafe对象来去实现Channel的一些操作(例如read, write等)
2. AbstractChannel
作用:
A skeletal {@link Channel} implementation.
主要做了什么:
- 定义了一系列的变量(如id, unsafe, pipline等等)
- 对id, pipline和unsafe对象进行了初始化, 其中unsafe对象的初始化使用了模版模式,让子类去实现
1
2
3
4
5
6
7
8
9
10
| public abstract class AbstractChannel extends DefaultAttributeMap implements Channel {
...
...
protected AbstractChannel(Channel parent) {
this.parent = parent;
id = newId();
unsafe = newUnsafe();
pipeline = newChannelPipeline();
}
}
|
3. AbstractNioChannel
1
2
3
4
5
6
7
8
9
10
11
12
13
14
15
16
17
18
19
20
21
22
23
24
25
26
27
28
29
30
31
32
| public abstract class AbstractNioChannel extends AbstractChannel {
...
private final SelectableChannel ch;
protected final int readInterestOp;
volatile SelectionKey selectionKey;
...
protected AbstractNioChannel(Channel parent, SelectableChannel ch, int readInterestOp) {
super(parent);
this.ch = ch;
this.readInterestOp = readInterestOp;
try {
ch.configureBlocking(false);
} catch (IOException e) {
try {
ch.close();
} catch (IOException e2) {
logger.warn(
"Failed to close a partially initialized socket.", e2);
}
throw new ChannelException("Failed to enter non-blocking mode.", e);
}
}
}
|
4. NioSocketChannel和NioServerSocketChannel
为了方便理解,这里直接分析这两者之间的主要区别。
区别一:关心的事件不同
NioSocketChannel关心的事件是Read, 而NioServerSocketChannel关心的事件是Accept。这一点在它们的构造函数中便体现了出来。
NioServerSocketChannel
1
2
3
4
5
6
7
8
9
10
| public class NioServerSocketChannel extends AbstractNioMessageChannel implements io.netty.channel.socket.ServerSocketChannel {
...
...
public NioServerSocketChannel(ServerSocketChannel channel) {
super(null, channel, SelectionKey.OP_ACCEPT);
config = new NioServerSocketChannelConfig(this, javaChannel().socket());
}
...
}
|
NioSocketChannel
1
2
3
4
| protected AbstractNioByteChannel(Channel parent, SelectableChannel ch) {
super(parent, ch, SelectionKey.OP_READ);
}
|
区别二:Unsafe的实现不同
在分析服务端启动流程的时候,我们知道,在调用fireChannelActive方法的时候,实际上做了两个事情,一个是真正调用fireChannelActive方法,另一个是注册read事件,如下:
1
2
3
4
5
6
| @Override
public void channelActive(ChannelHandlerContext ctx) {
ctx.fireChannelActive();
readIfIsAutoRead();
}
|
readIfIsAutoRead会走到下面这个代码段:
1
2
3
4
5
6
|
if ((interestOps & readInterestOp) == 0) {
logger.info("interest ops: " + readInterestOp);
selectionKey.interestOps(interestOps | readInterestOp);
}
|
这时,会有个疑问,ServerSocketChannel应该只对Accept感兴趣才对啊,为什么也要对其注册Read事件呢? 奥秘就在于Unsafe中,Netty是使用Unsafe对象来实现的Channel的读写等操作, 而ServerSocketChannel和SocketChannel的Unsafe对象的实现也是不同(从上面的继承图可以看出来一个是NioByteUnsafe,一个是NioMessageUnsafe),尽管它们都对Read事件感兴趣,对于ServerSocketChannel来说,它的读实际上是读连接(accept), 而对于SocketChannel来说,它的读是真正的读数据(Bytes),下面来看看这两者Unsafe对象的实现.
NioSocketChannel
1
2
3
4
| @Override
protected AbstractNioUnsafe newUnsafe() {
return new NioByteUnsafe();
}
|
1
2
3
4
5
6
7
8
9
10
11
12
13
14
15
16
17
18
19
20
21
22
23
| protected class NioByteUnsafe extends AbstractNioUnsafe {
@Override
public final void read() {
try {
do {
byteBuf = allocHandle.allocate(allocator);
allocHandle.lastBytesRead(doReadBytes(byteBuf));
if (allocHandle.lastBytesRead() <= 0) {
}
} while (allocHandle.continueReading());
} catch (Throwable t) {
} finally {
}
}
...
}
|
NioServerSocketChannel
1
2
3
4
| @Override
protected AbstractNioUnsafe newUnsafe() {
return new NioMessageUnsafe();
}
|
1
2
3
4
5
6
7
8
9
10
11
12
13
14
15
16
17
18
19
20
21
22
23
24
25
26
27
28
29
30
31
32
33
34
35
36
37
38
39
40
41
42
| private final class NioMessageUnsafe extends AbstractNioUnsafe {
private final List<Object> readBuf = new ArrayList<Object>();
@Override
public void read() {
try {
try {
do {
int localRead = doReadMessages(readBuf);
if (localRead == 0) {
break;
}
if (localRead < 0) {
closed = true;
break;
}
allocHandle.incMessagesRead(localRead);
} while (allocHandle.continueReading());
} catch (Throwable t) {
exception = t;
}
int size = readBuf.size();
for (int i = 0; i < size; i ++) {
readPending = false;
pipeline.fireChannelRead(readBuf.get(i));
}
readBuf.clear();
} finally {
}
}
}
|
1
2
3
4
5
6
7
8
9
10
11
12
13
14
15
16
17
18
19
20
| protected int doReadMessages(List<Object> buf) throws Exception {
SocketChannel ch = SocketUtils.accept(javaChannel());
try {
if (ch != null) {
buf.add(new NioSocketChannel(this, ch));
return 1;
}
} catch (Throwable t) {
logger.warn("Failed to create a new channel from an accepted socket.", t);
try {
ch.close();
} catch (Throwable t2) {
logger.warn("Failed to close a socket.", t2);
}
}
return 0;
}
|
至此,大概的了解了SocketChannel和ServerSocketChannel之间的几个主要区别,并对区别的实现有了一定的认识,,不得不说,阅读优秀的框架源码总是能让人感到惊艳。
兄弟篇: Netty的两种Handler
1. ServerBootStrapAcceptor
在第一篇服务器端的启动流程 这一篇章中我们知道,ServerSocketChannel在初始化阶段,会向pipline里注册一个handler —— ServerBootStrapAcceptor, 这个handler的作用就是处理 ServerSocketChannel在使用accept获取到一个新的SocketChannel时,被使用(见上面)。 尽管上面的注释中已经简短阐述了这个handler做的事情,这里再详细介绍一下,它对SocketChannel做了哪些事情:
1
2
3
4
5
6
7
8
9
10
11
12
13
14
15
16
17
18
19
20
21
22
23
24
25
26
27
28
29
30
31
32
33
34
35
36
37
38
39
40
41
42
43
44
45
| private static class ServerBootstrapAcceptor extends ChannelInboundHandlerAdapter {
...
...
@Override
@SuppressWarnings("unchecked")
public void channelRead(ChannelHandlerContext ctx, Object msg) {
final Channel child = (Channel) msg;
child.pipeline().addLast(childHandler);
setChannelOptions(child, childOptions, logger);
setAttributes(child, childAttrs);
try {
childGroup.register(child).addListener(new ChannelFutureListener() {
@Override
public void operationComplete(ChannelFuture future) throws Exception {
if (!future.isSuccess()) {
forceClose(child, future.cause());
}
}
});
} catch (Throwable t) {
forceClose(child, t);
}
}
...
...
}
|
可以看到,这个ServerBootstrapAcceptor对新创建的SocketChannel做了4个事情:
- 配置pipline
- 配置option
- 设置attribute
- 进行register:
- 将这个新的SocketChannel给register到EventLoopGroup中的一个EventLoop中(使用Chooser)
- 调用获取的EventLoop的register方法,将这个新的SocketChannel给注册到selector中.
2. ChannelInitializer
我们总是使用 ChannelInitializer 去添加handler初始化pipline,但其实它自己本身也是一个handler,在channelRegistered和handlerAdd时,会被调用下面的initChannel方法(保证会被调用一次),在这个方法中,会回调我们写的initChannel方法,并且将自己(ChannelInitializer)从pipline中移除。
1
2
3
4
5
6
7
8
9
10
11
12
13
14
15
16
17
18
| private boolean initChannel(ChannelHandlerContext ctx) throws Exception {
if (initMap.add(ctx)) {
try {
initChannel((C) ctx.channel());
} catch (Throwable cause) {
} finally {
ChannelPipeline pipeline = ctx.pipeline();
if (pipeline.context(this) != null) {
pipeline.remove(this);
}
}
return true;
}
return false;
}
|